
Thursday, December 27, 2012
Zoya Sharon
Zoya Sharon is the base for my my first gradient I did a few days back and just an absolutely gorgeous color. I really wanted a bright happy color to cheer me up with all these dreary days it it worked perfectly. It is so tropical and warm looking it reminds me of being in Florida. Sharon is a medium yellow toned orange that is bright enough that it doesn't come across pumpkiny at all. Application was pretty good but it did need three coats to be opaque. Formula wise this was also really good not to runny or goopy so I would definitely use this one again.

Saturday, December 22, 2012
My First Gradient
Today I have for you my very first gradient ever. I absolutely love gradient manis but I have always been too afraid to try one myself. I just don't understand how people get them so perfect! I definitely need a lot of practice but at least with these results I want to try again instead of give up. For my first time I am pretty happy with the results and it was a fun learning experience. For this look I started with three coats of Zoya Sharon as a base and then sponged on several layer of Cult Nails Feel Me Up. For the stamping I used Bundle Monster plate 318. For top coat I used Cult Nails Wicked Fast. I don't think this is the best to use with stamping because it smeared my index and middle finger. With the other two I was super gentle trying not to ruin them too. This is my first time using Wicked Fast with stamping so maybe I just need to be more gentle or wait even longer before I top coat even though I waited close to five minutes. I am still super happy with this look though and the smudges are barely even noticeable in person the camera just captures everything!


Sunday, December 16, 2012
Butter London Fishwife
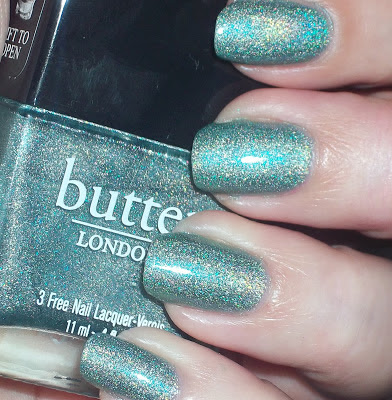
Today I have Butter London's Fishwife which is a light dusty blue holographic polish. It is a scattered holo which I actually prefer over a linear holo. It is like the whole nail is alive instead of just that big line that freaks out my camera. It reminds me a lot of Butter London's Victoriana except for it is the holographic version. Fishwife starts off really sheer but builds up to opaqueness after three coats. To be on the safe side I added a fourth coat because I wanted to make sure I didn't have any VNL. I'm not used to my nails being long like this so I just wanted to take extra precautions. The formula was great to work with not too thick or thin and dry time was quick as it is with most holographic polishes. Photos shown below are four coats of Fishwife without top coat.


Saturday, December 15, 2012
Zoya Reagan and Lara Stamping
Lately I have been really obsessed with pictures of stamping that show two colors together that are so close to each other but contrast perfectly for an effect that is just stunning. I never had a clue how they came up with the combinations and hadn't yet tried it but then a combination finally hit me. I was organizing my polishes today and came across the Zoya Beach collection that was actually still in the plastic box it came in. Lara and Reagan were sitting right next to each other and I thought they would make the perfect first attempt at the effect I was wanting. I absolutely love how the combination turned out and can't wait to try out more color combinations now that I think I've got it.
For this I used two coats of Zoya Lara and then added a coat of Cult Nails Wicked Fast. I then stamped using Zoya Reagan and Cheeky plate CH6. Reagan was so easy to use for stamping and came out great on the first try. I finished it all off with a coat of Seche Vite and am just amazed. I really really love this combination!

For this I used two coats of Zoya Lara and then added a coat of Cult Nails Wicked Fast. I then stamped using Zoya Reagan and Cheeky plate CH6. Reagan was so easy to use for stamping and came out great on the first try. I finished it all off with a coat of Seche Vite and am just amazed. I really really love this combination!

Friday, December 14, 2012
Challenge Day 7 - Snowman

Ok so I'm not even going to lie today I am cheating and using a design I came up with last year but I have two very good excuses. Okay, well one excuse and one reason. My excuse is that I just tried Color Club's Holiday Splendor for the first time and less than 24 hours is just not enough time to spend wearing this amazingness! And my reason is that this snowman mani was one of my first two attempts at nail art. I have always been addicted to nail polish but never even thought to try nail art til last December so these nails will always be really special to me because of that. They may not be the best but I was super happy with them and still am to this day.
For the mani I used Zoya Noel for my base color and then added Essie Shine of the Times over it to create a glistening snow effect. This was indoors but outside in the sun I just loved the way it sparkled just like new fallen snow. I will never be able to remember the colors used for my little snowmen so we will just skip that and get to the picture.

For the mani I used Zoya Noel for my base color and then added Essie Shine of the Times over it to create a glistening snow effect. This was indoors but outside in the sun I just loved the way it sparkled just like new fallen snow. I will never be able to remember the colors used for my little snowmen so we will just skip that and get to the picture.

 Loading InLinkz ...
Thursday, December 13, 2012
Comparison: Julep, Sinful Colors & Wet n Wild
One of my favorite Sinful Colors polishes is Nail Junkie. For one it definitely accurately describes me and for another it is just soo pretty! It's a dark green jelly type polish with lots of green and copper glitter to make it have that glass flecked effect. Then when I bought some of the new Wet n Wild winter polishes I realized that Happy Holidaze! looked a lot like Nail Junkie. Actually I found a sinful colors dupe, well at least going off the appearance in the bottle, to all the Wet n Wild holiday colors I picked up which I will probably do a comparison post on at some point. Then I get my Julep maven box that I upgraded and Harper appears to be another dupe to both of them. Now it's a beautiful color but I don't exactly need that many of it so I wanted to see if they are really dupes of each other and if anyone else but the crazy nail junkie needs them all.
Here is a shot of them in their bottles and from here they pretty much all look identical to each other.

They are all very similar with the green base and the glitter composition but there are no actual dupes here just a very slight variation on a theme. The glitter is about the same in all of them but what makes them different is the base.
For the first coat Julep had the lightest most sheer base and also the least amount of glitter, Sinful had the darkest base color, and Wet n Wild was about the same as Juleps for the base color but had the densest amount of glitter. After two coats Julep and Wet n Wild look the most alike still sheer base but the glitter is almost the same. Sinful colors is almost opaque at two coats.
After three coats it's like Goldilocks and the three polishes: Julep is still just too sheer and thin, Wet n Wild is so dense with glitter it is goopy but still not quite opaque, and Sinful Colors is just right with complete opaqueness and amazing glitter! In pictures the visible nail line can be seen on Nail Junkie but it is not visible in person.
So they are all similar but just a little bit different. Julep is at the bottom of my list because at $14 a bottle it should be so much better but I can get the same effect seen in the bottle from Sinful for only $2. Sinful is definitely the best of the three for coverage and price. The pictures below are shown with three coats of each polish and topped with HK Girl topcoat.
From left to right: Julep Harper, Sinful Color Nail Junkie, & Wet n Wild Happy Holidaze!


Wednesday, December 12, 2012
Challenge Day 6 - Christmas Trees
For today's challenge I started out with three coats of
Finger Paints Elves Bells. I just got this color today and like many
other polishes I am in love. I was glued to this color as soon as I
picked it up at Sally's today. I have never been a huge fan of gold so I
was surprised it was the one color I picked from the display. The green
and red spots were made using Zoya Logan and Blaze. On my ring finger I
used Zoya Logan to create the tree and then used Maybelline Bold Gold
and Nfu-Oh 61 to create a garland on the tree. Using rhinestones I added
a star to top the tree off and tiny little ornaments.

 Loading InLinkz ...
Day 5 Reindeer
Another day I wasn't super happy with but I did try so it's only fair to show the end result :)


Challenge Day 4 Bells
I wasn't super happy with how these turned out but I decided I am going to post them anyways. Not all nail art is perfect or turns out how it is in your head but I am still proud of my effort and giving it a shot.

Loading InLinkz ...
 Loading InLinkz ...
Thursday, December 6, 2012
Day 3 - Snowflakes

Snowflakes are so pretty and unique and just beautiful but getting them on the nails seemed like a really hard task for me. I had so many ideas floating around my head but finally settled on a jelly sandwich with stamping. I started off with a glue basecoat so I could easily remove the glitter and then put on one coat of Revlon's Calla Lily which is a sheer white jelly polish that shimmers like gleaming snow. It is very very sheer even for a jelly so after I added one coat of Juleps Vivien I added a coat of Sally Hansen's Polar Bare which is also a jelly but a more opaque white. That helped take care of how sheer it was and made the nail line a lot less visible. I added one more coat of Vivien and finished with one last coat of Calla Lily. I had to let it dry quite a long time before I could even think of doing stamping because it just would have destroyed the entire mani. For the stamping I used Maybelline Bold Gold which has got to be the best gold stamping polish ever! If you don't own this seriously go out and buy it now. I used Bundle Monster plate 323 for the snowflakes and it really just brought the whole thing together and I fell in love. I topped everything off with one coat of HK Girl.

 Loading InLinkz ...
Tuesday, December 4, 2012
Day 2 - Candy Canes
When I was little, well even now, my favorite type of candy cane were the blue raspberry ones. There is just something about a candy that turns your mouth bright blue so you can then turn to people and stick your tongue out at them while asking if it is blue :) So for candy canes I knew I wanted to do blue ones but then I started thinking about the multi-colored packs ant thought that would be really fun so for today's theme I have four different flavors/color combinations of candy canes. For all of the nails I used stamping using Cheeky plate CH11.
Polishes Used:
Blue Raspberry: Revlon Coastal Surf for base & Julep Eloise stamped
Grape: Sally Hansen Good to Grape base & Sally Hansen Insta-Dry Lively Lilac stamped
Peppermint: OPI Thanks So Muchness base & Sally Hansen Insta-Dri Whirlwind White stamped
Cinnamon: Wet n Wild Candy-licious base & Sally Hansen Insta-Dri Rapid Red stamped
 Loading InLinkz ...
Sunday, December 2, 2012
Challenge Day 1: Red & Green
Today is the first day of the challenge and that would red and green day! I was having a hard time feeling Christmas-y until I started my nails. Somehow the red and green really does something to put your head in the frame of mind of Christmas and now I'm all excited! I wanted to keep it kind of simple but of course it needed a little bit of extra pizazz so I through in some red and green rhinestones. For this mani I started out with two coats of Essie Blanc and then one coat of OPI Kyoto Pearl. I then added some stamping with Maybelline Bold Gold using Bundle Monster plate 322. I decided to use my index finger as my accent today so that is where I through the red and green rhinestones and I just love how the 3D effect turned out. It looks a lot better in person than it came across in the pictures. For the rest of the nails I filled in the circles with red and green using Zoya Logan and Blaze.


I am super excited for this challenge and am loving what everyone else has come up with so make sure to check them out too!
Loading InLinkz ...Wednesday, November 28, 2012
Butter London Wallis and Hampstead Heath Comparison
This is just a quickly little post where I wanted to show the different between Wallis and the new GOOP limited edition polish from the Bespoke Collection, Hampstead Heath. In my head they were very close when I purchased the set online. I know other people thought the same thing because that was one of the first questions I was asked when I posted a picture to one of the groups I'm in on Facebook about how they two compare to each other. It's good to know that they are really nothing alike so you could get away owning both completely guilt free! Wallis is a more goldeny green and Hampstead Heath is a dark hunter green polish that is full of flecks and just gorgeous. I plan on fully testing out this color very soon. It will be perfect for the holidays! If you are interested in Goop exclusive collection of Trifecta Bespoke Lacquers they can be bought here for $36. I will also include a picture of the entire set so you can check out the lovelies.


Tuesday, November 20, 2012
Beetlegeuse! Beetlegeuse! Beetlegeuse!!
Beetlejuice is probably one of my top 3 favorite movies of all time so I am super excited to enter this contest and have a chance to win the Beetlejuice Collection by Models Own!! Thanks so much to Paper Thin Nails blog for this amazing chance!
Sidenote: Although the movie is called Beetlejuice and that is how his name is pronounced it is actually spelled Beetlegeuse but better be careful saying it three times no matter how you spell it :)

For this I used: Essie Blanc, Cult Nails Nevermore, Cult Nails Deal With It, striping tape, and red & green rhinestones.
Wednesday, October 24, 2012
OPI Skyfall
OPI Skyfall is from the new OPI Skyfall collection for the new James Bond movie. Skyfall is a great almost brick red creme polish and reminds me a lot of OPI Mrs. O'leary's BBQ. The formula on this was perfect, not too thick or thin, it just glided on like butter. In person this color is a little more dark than it photographs but I am still loving it. Skyfall was completely opaque in two coats. It dried to a nice shine and then I top coated with one layer of Seche Vite.
I'm not really one for following nail polish trends. If I want to wear neon in December I will and not think twice! But this is one of the "hot" colors for fall since it is close to the Oxblood color we have been hearing is sooo popular. So if you want a great fall color this one is definitely a great one to pick up!!!


I'm not really one for following nail polish trends. If I want to wear neon in December I will and not think twice! But this is one of the "hot" colors for fall since it is close to the Oxblood color we have been hearing is sooo popular. So if you want a great fall color this one is definitely a great one to pick up!!!


Wednesday, October 17, 2012
NOTD Creepy Crawly

This design was inspired by Gina, soguesswhat11 on youtube and her awesome tutorial that can be found here. For this I used three coats of Wet n Wild 9.0.2.1.Orange which I am pretty sure is my new favorite orange and is absolutely perfect for fall/Halloween. I then stamped a design that reminded me of spider webs off of Cheeky jumbo plate D and a spider on my accent nail using Mash plate 38. I added a little black rhinestone to give the spider a little more dimension as shown in the video and it seriously is a little bit creepy. I topcoated it all with a layer of seche vite. I really really love these nails! Thanks so much to Gina for the inspiration! If you haven't checked her out already please do so because her tutorials are amazing.
Tuesday, October 16, 2012
Zoya Julieanne
Zoya Julieanne is a beautiful royal purple with purple flakes that also shine to gold if it just the right way in the light. Formula on this was great and was not too thick or thin. It was fully opaque after just two coats and dries to a glossy shine. It is really an amazing color and so easy to work with. If you are looking for a great purple with a little something extra then I definitely recommend checking this one out!


Saturday, October 13, 2012
NOTD Stamping

For this manicure I started off with two coats of this gorgeous blue by Color Club called Insta-this. I then used one coat of HK Girl top coat and followed that up with stamping using Bundle Monster plate 319. For the stamping I used Maybelline Color Show in Bold Gold and then finished with another layer of HK Girl. I really love how this came out can't wait to try out other puzzle color combinations!
Thursday, October 11, 2012
Butter London The Black Knight
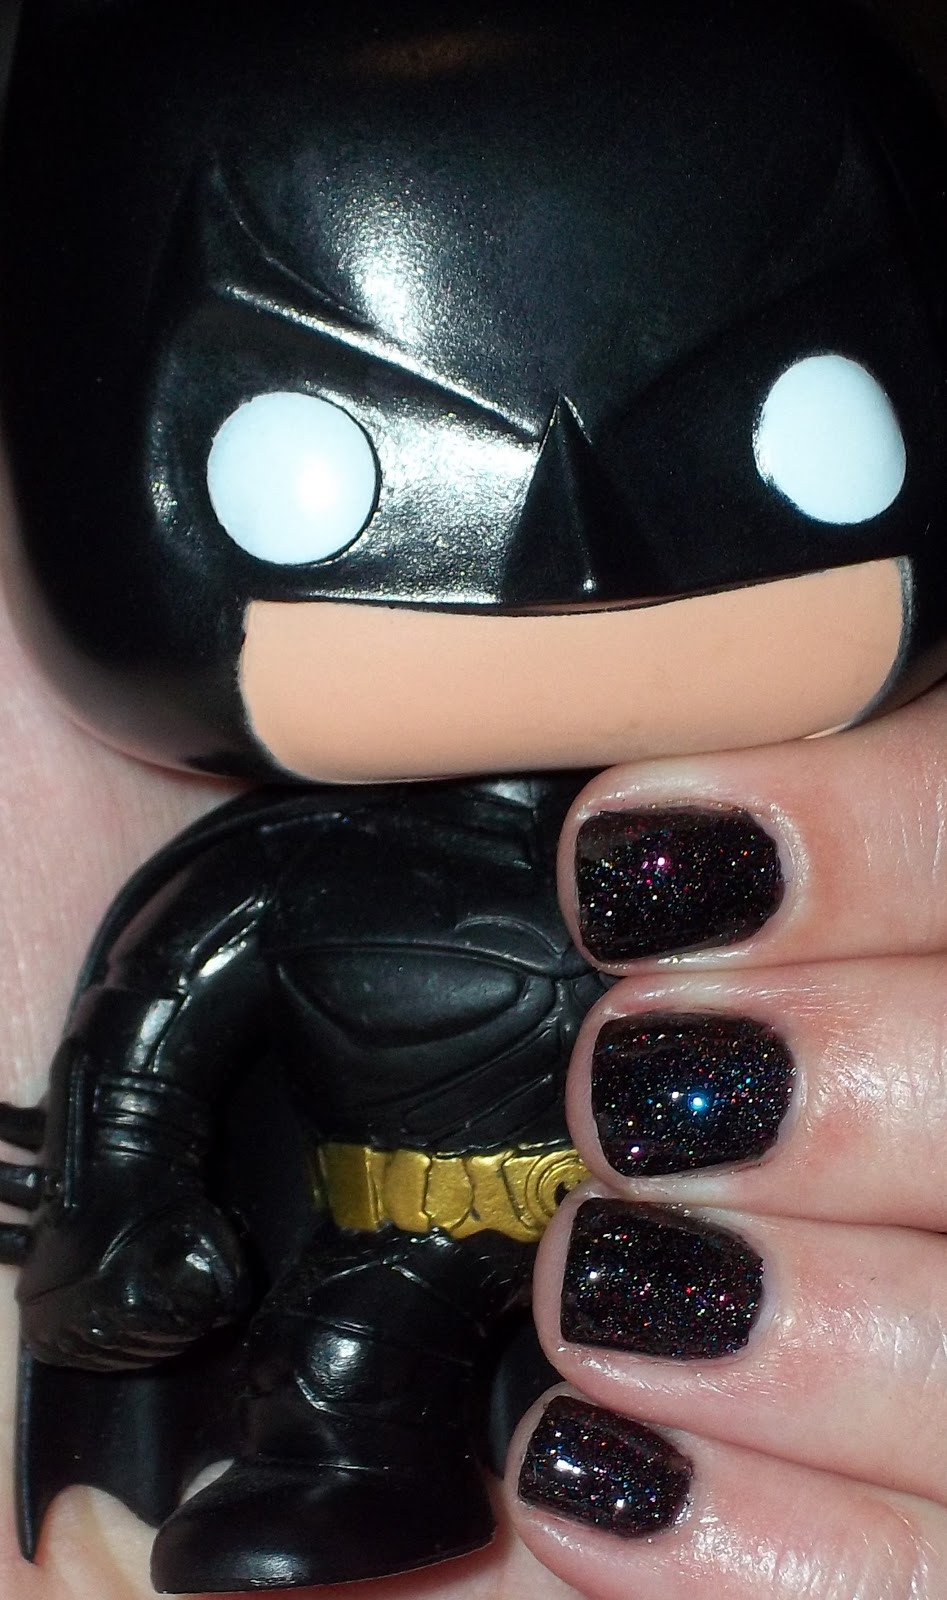
Butter London The Black Knight is probably in the top 5 of Butter Londons most popular polishes. I know that ever since I first saw it I had wanted it but at first it was a limited edition color. Thankfully they were smart enough to make it a core color! Another reason I wanted this polish is because the name really just reminds me of Batman and I love Batman! Make sure you look out for the picture of the two together.
The Black Knight is a black base with tons of different colors of glitter thrown in but mostly blue, fuchsia, and some gold. All you need is two coats to get it completely opaque. It will dry a bit matte and definitely has a rough texture because of the glitter so a top coat is needed. In fact it eats top coat a little bit so you will won't two coats for the best shine and optimal glitter gleaming! For this I used two coats of HK Girl. I am very happy I got this polish and it completely lives up to the hype and all of my expectations of this polish. If you have a chance make sure you try this out!
Also don't forget to enter the giveaway that is going on with 8 different blogs including mine! There's only a few more days left to enter for a chance to win some amazing prizes. You can enter a few posts down on the blog giveaway post. Good luck!!


Wednesday, October 10, 2012
Orly RIP
Ever since I saw this color released I knew I had to have it. I have said this before but Halloween is my absolute favorite holiday! So of course I go to every Sally's in my area and none of them actually have this color. Last week I was super excited when I got a package from my friend Samantha and this was a huge surprise in there for me along with the Nfu-Oh she let me borrow.
R.I.P. is a sheer black base polish with large pieces of orange foil glitter and small gold/coppery glitter. This is the absolute perfect fall/Halloween color for me. The glitter pay off is great too I only had to use one coat for all that glitter. Pictures are shown with one coat of Orly R.I.P. over one coat of Cult Nails Nevermore then topped off with one coat of HK Girl.


R.I.P. is a sheer black base polish with large pieces of orange foil glitter and small gold/coppery glitter. This is the absolute perfect fall/Halloween color for me. The glitter pay off is great too I only had to use one coat for all that glitter. Pictures are shown with one coat of Orly R.I.P. over one coat of Cult Nails Nevermore then topped off with one coat of HK Girl.


Monday, October 8, 2012
Base Coat Comparison for Holographic Polish
My friend Samantha of Just One More Bottle let me borrow her bottle of Nfu-Oh 65 and I have to say I am now addicted to Nfu-Oh. They just make the most perfect holographic polishes of any I have tried. Ok so this is only my third holographic polish and two of those are Nfu-oh but still! These are amazing! This is a light blue aqua holographic polish that really makes me feel like I have mermaid nails that I just can't stop staring at. Application was really smooth and it was good to go in two coats. Holographic polishes do dry faster than normal polishes which is a good thing but also means you have to work quicker.
She also was super sweet and sent me Nfu-Oh Aqua Base to try out. Aqua base is a specialty base coat that is really supposed to make the holographic action pop! Surprisingly aqua base is not aqua but a milky color and dries clear. I wanted to test out how this would compare to using no base coat like my post on Nfu Oh 61, the LA colors nail hardener which is a aqua tinted base coat, and Rimmel base coat which is just clear.

For the first coat I would say that Nfu Oh Aqua Base is the clear winner for the most holo-ness with no base coat and LA colors coming in close second. I had a little trouble with the pinky that had the clear Rimmel base on it but I think that may have been because my bottle is a little older.

For the second coat of Nfu Oh 65 they all ended up pretty much even and very holographic!! The top two would be either using no base coat at all or the Aqua Base. Considering the cost though I would say you are much better off going without a base coat at all because the holo is pretty much equal. In a very close second place I would say the LA Colors aqua tinted base coat is a good choice especially at only $1. You get tons of holo with that and it is pretty much equal with the first two. The clear base is the one I think that worked the least but I still blame that on the old base coat. Still all these methods came out really close so it then just comes down to personal preference.
I think that the first coat of holographic polish is acting as a basecoat those at this point for the second coat and creates OMG amazing nails!


Also, don't forget to enter the giveaway in the post below! Only 6 more days to enter!
Sunday, October 7, 2012
Huge Collective Blog Giveaway!!!!
I've teamed up with some awesome nail blogs to give you some great chances to win some amazing prizes!
I will be giving away a mini set of The Bondettes from the new Skyfall 007 collection! This includes a mini of GoldenEye, The Spy Who Loved Me, The World is Not Enough and Live and Let Die.

Casey will be giving away the China Glaze Wicked 4 pc. set to one lucky follower of her blog Saving the World One Nail at a Time!
This set includes full size bottles of China Glaze Bizarre Blurple, Roughish Red, Glitter Goblin and Ghoulish Glow. You may recognize China Glaze Ghoulish Glow from my glow in the dark ghost mani I posted a tutorial on earlier!
Each blogger is giving away an equally fantastic prize! Vicki from Nail by Vi will be giving away a nail stamping set complete with scraper and multiple nail plates.

Samantha from Just One More Bottle will be giving away this China Glaze/Seche Vite Support Awareness set.

Kari from Finger Glaze will be giving away two Butter Londons in The Old Bill and Pillar Box Red as well as Butter Londons Hardwear Quick Dry Topcoat.

Jill from Glisten and Glow will be giving away an amazing set of her own brand! In this set you can win a 4oz body was in Sangria White Peach, an 8oz body butter in Sangria White Peach, a Glis-tcs Cuticle oil in Chamomile and HK Girls famous top coat!

Michelle from Rain Down on me Beauty will be giving away an elf nail file, Zoya fast dry drops, nail stickers, a jar of nail stars and a Deborah Lippman Tiny Dancer.

Fiorella from Fiorellas Closet will be giving away Orly Buried Alive, Tokidoki Sandy, China Glaze Stone Cold and Orly Mysterious Curse.

What are you waiting for! Enter using the Rafflecopter widget below to get as many entries as you'd like to win one of these amazing prizes!
a Rafflecopter giveaway
Subscribe to:
Posts (Atom)